Pi, Pressure and Power, general background discussion.
(Remember, when something appears in parenthesis, you can safely ignore it without missing anything important. We think these remarks may be interesting but they are not essential to the main point of the discussion.)
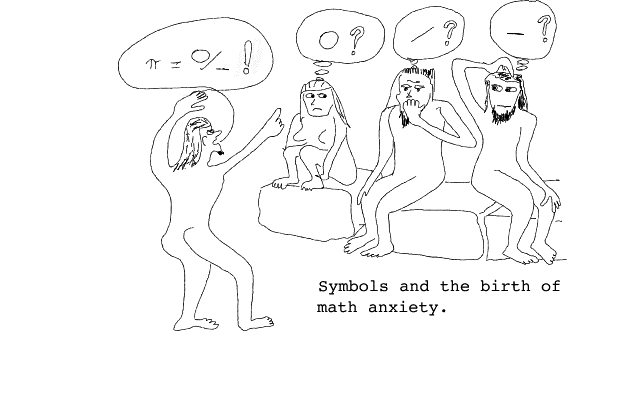
I Symbols and what they mean. Almost all of what we learn in school is related to manipulating symbols. Reading, writing, drawing, talking, are all ways of fooling around with reality without really experiencing the reality. Physicists make extensive use of mathematics, not only because mathematical symbols can be used to represent physical reality but, mathematics makes it possible to manipulate these symbols in a way that makes it possible to test the internal logic of an argument. The danger in all of this is that one can learn how to manipulate the symbols without really knowing what they mean. We feel that when kids learn to talk there might be a long time between when they learn how to make the words and when they finally know what the words mean. (We leave the details of this to the psychologists since we really don't know anything about how very young kids learn language.) In our experience with high school and college students, however, we do know that they can plug into formulas and get correct answers even if they don't have a clue about what it all means. Symbol manipulation becomes an end in itself and often a student can be quite successful at this manipulation without understanding much about the physics involved. In this unit we have chosen three concepts which, at best, are only slightly related to each other. Some might find these three concepts confusing simply because their names all begin with "P", we hope not! (We have avoided using the correct Greek letter for "pi" because we aren't sure that your browser includes it in its character set.) Others might find them confusing since they are all represented as ratios (and we have been told that understanding ratios is one of the most difficult things kids learn.) The main reason we have included this group of three is because many people, even though they know the words, (or the symbols) really don't know what they mean!
What does pi mean? Ask this question of almost any student in high school, even students who have completed algebra and they will usually say something like: "pi is 3.31416" or they might say: "pi is 22/7" but when you say you don't just want to know the number pi is approximately equal to, rather, you want to know what pi really means, you usually get confusion. Students can usually say that it has something to do with circles but beyond that, there is mostly little understanding. Rarely will a student say: "pi is the ratio of the circumference to the diameter of a circle." Or, an answer that is just as good and just as rare, is a drawing of a circle and the person will illustrate the circumference and then illustrate the diameter and say something like:"when you divide this distance (while pointing to the circumference) by this distance (pointing to the diameter) you will get pi."
The concept of pi is no more complex than this, yet it is rarely understood. The amazing fact that pi is the same for all circles, large or small, is still another thing few understand. We hope to provide an activity that will help your students understand the meaning of pi in what follows.
It is interesting to speculate about the discovery of pi. Who was the first genious to discover that all circles will always have the same ratio of circumferenct to diameter? In the excitement of the discovery, what kinds of problems came up in attempting to comunicate this amazing fact to others?
When considering how few people, even today, really know what pi means, we can be fairly certain that the genius who discovered this relationship had a very hard time communicating its meaning to others!
What does Pressure mean? The word "pressure" is so often used outside of physics that its physical meaning is often lost. "Peer pressure", "Grade pressure", "Parental pressure", etc., must have a clear meaning when people use these terms but it is doubtful that their meaning resembles the term used in physics. We assume you know what force is (see the earlier unit on: "force, work and power") and we also hope you know what area is (see the earlier unit on: "length, area and volume"). Pressure is simply the ratio of force to the area on which the force acts. Or, pressure is force per area. It helps most people to understand the difference between force and pressure if you ask them: "Can you push your thumb through a piece of word?" Most agree that they can't . Then ask: "Can you push a thumb tack into a piece of wood?" Most agree that they can. The difference in these two cases is the difference between force and pressure. Even if the force exerted by your thumb is the same in both cases, since the area of the point of the tack is so much smaller than the area of contact made by your thumb, the pressure at the end of the tack is much larger than the pressure exerted by your thumb alone. (Now is the time to allow thinking to take place.)
What does power mean? We hope we have explained power in the previous unit on force, work and power. This is another word that has found its way into common usage that has little relation to the word as used in physics. ("Power to the People", "Power Trip", "The Power of Positive Thinking", the list goes on and on!) Power is work (or energy) per time. Again we have a ratio of two other concepts which must be understood in order for power itself to be understood. Many ideas in physics are defined as ratios. Density, velocity, electric current, power, pressure, electrical resistance, to name a few. The fact that so many ideas in physics are expressed as ratios and we are told that young children have real difficulty with the concept of the ratio, has inspired us to develop the following activities.
II Purpose of the Activities:
The purpose of these activities is to investigate the meaning of pi, pressure and power.
(There will be three different activities and there is no reason that they be done together. It was our idea to choose concepts that are often verbalized without understanding, all of which could be represented as ratios. You, as the teacher, should be aware of the fact that the three concepts investigated are often used without understanding and that they are all expressed as ratios. However, since they really aren't connected to one another, use the following activities at any time you feel appropriate.)
III Materials required for the Activities:
The meaning of pi: Several different circular objects (for example, cans, jars, rolls of tape, anything that is nearly a perfect circle in cross section). a paper measuring tape ( we feel that a metric tape would be best. These can be obtained, free, at stores that sell furniture and other goods made in metric sizes, for example, Ikea.) If you can't get a paper tape, some string and a ruler will work. Perhaps photo copies of a prepared data table in which students will record their data.
The meaning of pressure: Small squares of cardboard (about 10 cm on a side will be fine) cut from a large cardboard box, several different sizes of nails.
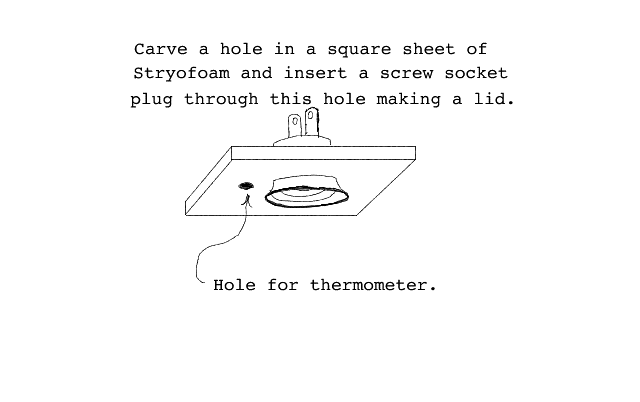
The meaning of power: (Power has been discussed in a previous unit and the activity in which the students run up a flight of stairs to measure their power is probably the best way for students to get a real feel for what power means. However, here is another activity to try, perhaps as a demonstration.) Several different wattage light bulbs. It probably would be best if they all are the same size on the outside, only their wattages are different. Several large Styrofoam cups or containers large enough to surround the largest bulb, the entire glass part, easily. The kind of cups used to serve milk shakes in should work well. However, if the bulbs are smaller, the smallest cup that will hold the bulb and allow it to be completely surrounded with water will be best. A thermometer or, several thermometers if possible. A special electric socket which can be plugged into an extension cord, a small extension cord and a piece of flat Styrofoam which can be carved to hold the socket and which will cover the top of the cup.
A stop watch or a clock with a second hand. Since it will be suggested that you do this activity as a demonstration, only one set-up is required. However, we also include the possibility that individual groups of students might do the experiment, hence, multiple set-ups will be required.
IV What the teacher must do in advance of the activities:
The meaning of pi: Mark each of the circular objects with a unique number so when your students record the data you can know which one they were measuring. Be sure you have a good range of sizes but avoid anything any smaller than 2 cm in diameter (since they are difficult to measure) and larger than whatever size your measuring tape won't go around. Do make sure that all of the circular objects have at least one flat end so you can measure the diameter easily. (For example, a ball won't work but a can will.) Either have enough duplicate things for students to work in groups or work out a way so the students can pass the things around so everyone will have a chance to measure many different sized objects.
The meaning of pressure: Hopefully you have been able to obtain many different sizes of nails from small diameter nails to 20 penny "common" construction nails. (You will discover that, at any size, the "box" nails always have a smaller diameter than the "common" nails. We suggest that you use nails with heads and not finish nails so it will be easier for the students to press them through the cardboard.)
The most difficult part of preparing this activity will be in cutting the points off of the nails. If you are unable to do this, see if you can get an interested parent with the appropriate tools to do it for you. Here is a description of how we did it and we hope you can make it happen:
Preparing the nails for this activity:
The important thing is to select nails with different diameters. All the nails we used were box or common (not finish) so that they would have substantial heads. The largest nail we used was 20 penny common and the smallest was about 4 penny box. Using a small pair of bolt cutters (here of course is the catch--how many elementary school teachers have bolt cutters!?) cut off the points of the nails. As an alternative to bolt cutters, the small nails can be cut with pliers and the larger ones with a hack saw. After the nails have been cut, it will be necessary to file or grind the cut end flat.
It will be best if the cut nails are all the same length so use the shortest nail to determine how long all the other nails must be cut. We placed a masking tape flag with numbers on each nail so when the students make their data sheet, they will be able to refer to each different sized nail by number. (We measured them and used wire gauge numbers--but any number system you use to tag the nails from smallest to largest will work. In fact, wire gauge can be confusing since the largest size has the smallest number!)
Preparing the cardboard squares for this activity:
Select the cardboard from an ordinary cardboard box. Cut them into squares approximately 10 cm on a side. Since we will be pushing the nails through the cardboard, it will be important that the students always press the nails through a place where there is a single thickness of cardboard. Study the piece of cardboard in side view to establish where a single thickness exists and perhaps draw lines on the surface to indicate where the nail should be pressed through. (We feel that this should be left to the students--part of their task will be to study the cardboard square and mark lines on the board where they can press the nails. They must be certain that they will always be pressing through a place where there is a single thickness of cardboard. Will this be too difficult for them to do?)
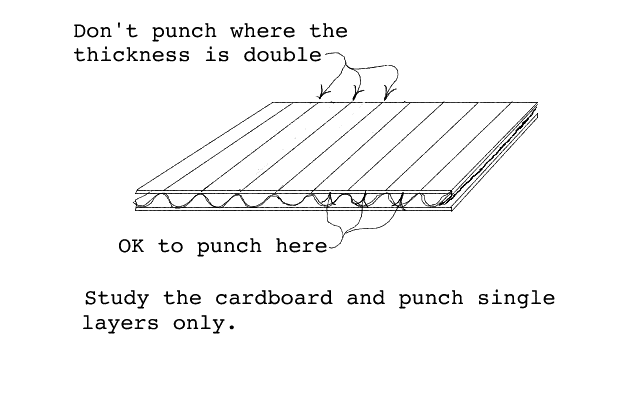
If you look carefully at the surface of the cardboard, you can usually see lines where the corrugations are glued to the top surface and it will simply be your task to identify the places where the board is only a single layer thick rather than a double layer thick.
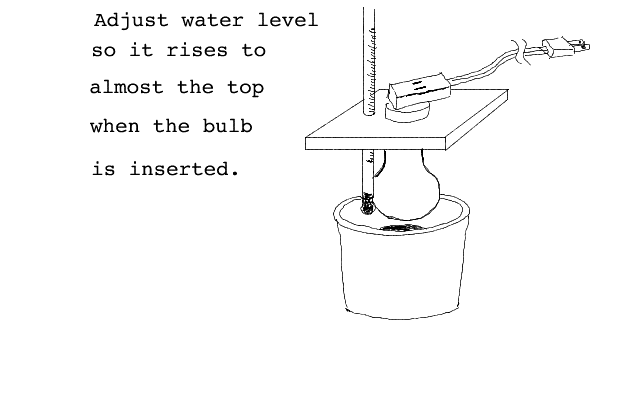
The meaning of power: This will be a demonstration activity in which the teacher will insert different sized light bulbs in a measured amount of water and then see how much time it takes the bulb to heat the water through a specified temperature change. It is not really dangerous to do this but since you are fooling around with electricity and water, it is probably best if the actual manipulation of equipment is left to the teacher. An essential part of this demonstration is to have a device which will hold a light bulb upside down in a Styrofoam cup of water. The equipment for this experiment should not be too difficult to construct and we hope you can arrange it since we believe the experiment will bring real understanding to what the "power rating in watts" means for different light bulbs.
Most hardware stores carry the screw socket plug and a small inexpensive extension cord will do fine. If you can, select bulbs that are almost the same external size yet have a wide range of power ratings in watts. Select the Styrofoam cups so that they are large enough to easily accommodate the bulbs and carve the "cap" out of Styrofoam so that the screw plug fits snugly and there is room along the side to insert a thermometer. You will have to experiment with the amount of water necessary to cover the bulb almost to the top but not so high that it fills up into the screw threads. After you have discovered how much water is required, mark all the cups so you can fill them all with exactly the same amount of water.
Note: If you are really bothered with the prospect of inserting a light bulb in water and then plugging it into an electrical outlet, don't attempt this demonstration. We assure you that everything is insulated and there is little or no danger involved but, if you are apprehensive, don't do it. We caution that you make sure that the water is not rising into the screw threads of the socket plug (and even if it did, there wouldn't be a major danger.) The water is in an insulated cup, the top support is insulated and when you insert the electrical plug into the wall, you are at a safe distance from the apparatus. Measuring the temperature of the water with a thermometer is no danger provided you are using an ordinary glass thermometer. We don't suggest your students do this activity but we feel that a thoughtful adult can do this experiment with no more risk than using an immersion heater. (Part of our objective in making this page is to get teachers to have more confidence in attempting novel science activities. Too many people have an unreasonable fear of electricity--respect is required but fear is, in too many cases, excessive.)
Teaching suggestions which might be useful when presenting the concepts of pi, pressure and power.
Student Activities on the concepts of pi, pressure and power.