The following is a "pilot activity" to let you know how we plan to present these activities in the future and to give you an opportunity to tell us if we even have the right idea. In this pilot activity, the statements you see in parenthesis are intended to let you know why we are doing it this way. In the future these parenthetical statements probably should be dropped (what do you think?).
I Words: (Words are essential to the conveyance of ideas. Even the most "hands on" approach must use words to set the students on task. We feel that much of the difficulty people have with physics is the failure to realize that physicists use words in very precise ways and often the general public uses the same words in ways quite different from the original physicist's definition. It has been stated that web pages that have too many words fail. If you agree, you probably won't even get this far, however, our assumed audience can read and we hope will appreciate carefully chosen words as important tools of education. We plan to begin each of our activities with what we feel are good written definitions of the concepts we intend to explore.)
Length: This concept is so basic that it is really impossible to define. However, people use other words like: "distance", "width", "height" etc. to express the same basic concept. Length can be measured in feet, inches, miles, furlongs, light-years, etc. We will usually try to use meters and centimeters in the discussions that follow.
Area: Now that we know what "length" means (even through we couldn't really define it) it's easy to define "area". Area is the number of square length units it takes to cover a surface. Lots of people will say that "area is length times width." However this doesn't really give you the concept, rather, it tells you how to find it if you know something else (length and width) and it only works if the surface is rectangular. What if you want to find the area of the bottom of your shoe? The bold definition given above should force you to see a surface (perhaps the bottom of your shoe) covered with squares. When you are asked to find the area, you should think in terms of counting these squares.
Area can be measured in square meters, square centimeters, square kilometers, etc. Area could also be measured in square feet, square inches or square miles. We plan to stick to metric units in these discussions.
FYI: (Whenever you see "FYI" it means the usual: "For Your Information". However, please feel free to ignore all FYIs. They aren't necessary for the discussion at hand and they are only included so we can show off.) An acre is a unit of area and there are 640 acres in a square mile. A hectare is a metric unit of area and it is 100 meters by 100 meters. If you think about it you will discover that there are 100 hectares per square kilometer. Should you ever want to convert, there are about 2.47 acres per hectare. We plan to avoid all conversions in our discussions--we will just use metric units as though everyone liked them the best.
Volume: Again, once you know what length is, volume is easy. Volume is the number of cubic length units it takes to fill a space. The space can be any shape you want and if it happens to be a rectangular solid, you can find its volume by multiplying length by width by height. However if the space you are interested in happens to be inside of a football, then computing it might be difficult but the concept of volume is still the number of cubes it takes to fill the space.
Volume can be measured in cubic meters, cubic centimeters, cubic inches, etc.
FYI: The liter is essentially the volume of a cube 0.1 meters on a side. If you think about it, you will see that it will take 1000 liters to fill a cubic meter. One thousandth of a liter is called a milliliter or "ml" and a milliliter is essentially the same thing as a cubic centimeter. For quick conversion purposes, a liter is about the same thing as a quart (which is a "quart"er of a gallon.)
II Purpose of the Activity: (We hope you didn't get too bored with our "Words". However, we feel that first we must understand the language we are going to use before we jump to the next step. In this "purpose" part of our presentation we hope to make it clear to the teacher what we hope to accomplish with the activity. If we all know what we are attempting to do, then it will be easier to know how to improve what we are trying to do and to determine at the outset if it is even worthwhile.)
The purpose of this activity is to learn about the basic concepts of length, area and volume. To understand what makes each of them different but also to see how they are related.
III Materials required for the Activity: (This is probably the first thing a teacher needs to know if he/she will even be able to think about doing an activity. We hope to design all of our activities so that the required materials will be fairly easy to obtain. Naturally, the amount of material required will depend upon the class size, whether or not the teacher intends to have the students work in groups, etc. These kinds of details seem best left to the pros who face the class. If we can describe what we have in mind for the activity, we are confident that the experienced teacher will almost certainly revise our original plan to fit the specific demands of the particular classroom situation.)
Centimeter rulers, Four different colors or yarn (if yarn is difficult to obtain, thin strips of colored construction paper will probably work), Four different colors of construction paper (closely matching the yarn colors), pencils, scissors, glue-sticks.
IV What the teacher must do in advance to prepare for the activity:
1. Cut yarn (or strips of construction paper) into small carefully measured segments. Make enough segments of the same length and color so either each student or each group of students will have a set of different lengths to work with. We suggest the following:
|
Color of length segments |
Length of segment |
( The color is not really too |
|
Violet |
3 centimeters |
important but we thought it |
|
Blue |
4 centimeters |
would be nice if they sort of |
|
Yellow |
5 centimeters |
corresponded to the wavelength |
|
Orange |
6 centimeters |
of light.) |
2. Use a paper cutter to cut the colored construction paper into squares the sides of which correspond exactly to the above length color scheme and size. Again use your judgment as to how many you should make (students will be drawing on these squares so you probably will need more than you did of the yarn.)
3. Make Xerox copies of the cube patterns. (We have attempted to make the patterns exactly the correct size but in the downloading and copy process, they may change. Hopefully you can adjust as needed with your copy machine.) It's not necessary but it might add interest if you use an appropriately colored felt pen to color in the size numbers on bottom of each cube.
Click here to see the 3 centimeter cube pattern.
Click here to see the 4 centimeter cube pattern.
Click here to see the 5 centimeter cube pattern.
Click here to see the 6 centimeter cube pattern.
Once again, final image size (and quality) may be a problem. Each of these patterns were made to fit on a standard sheet of paper (8 1/2 by 11 inch) yet in the download process we really doubt that the final image will be the correct size. You may even find it to be more convenient to load our patterns, adjust their size on your copy machine (each small square should be exactly one centimeter) and then trace the image with a good black pen onto another piece of paper to improve image quality. We will be interested in hearing from you if any of these suggestions work.
(Since we are clueless about teaching young people, the following are nothing more than how we envisioned using these materials. We will try to give you what we had in mind and hope that we are not way out of line. You are the pros in this department and we are only making suggestions.)
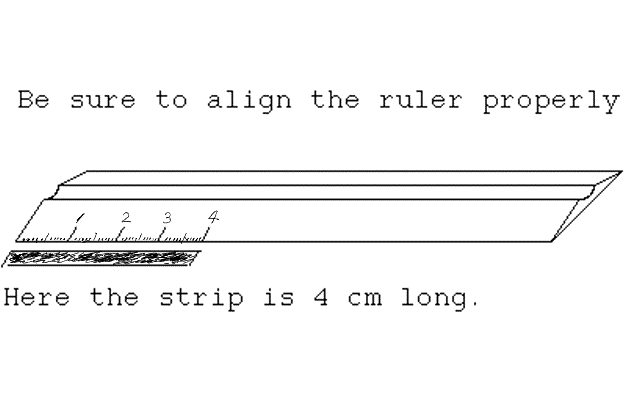
Measuring length: With rulers and measured segments of different colored yarn (or construction paper strips), have the students measure each different colored yarn segment and record their results in the table provided in the "Student Activity Sheet." It has been our experience, even at the secondary school level, that some students don't know how to position the beginning of the ruler on the item to be measured and are confused as to how to use the proper scale if the ruler has both inches and cm. Some rulers make it confusing as to which are centimeters and which are millimeters. Since you have prepared the segments of yarn in advance and since you know what their correct lengths are, it should be possible to spot and correct errors. We think that working in groups and then comparing the results of several groups should help to make feedback and corrections possible.
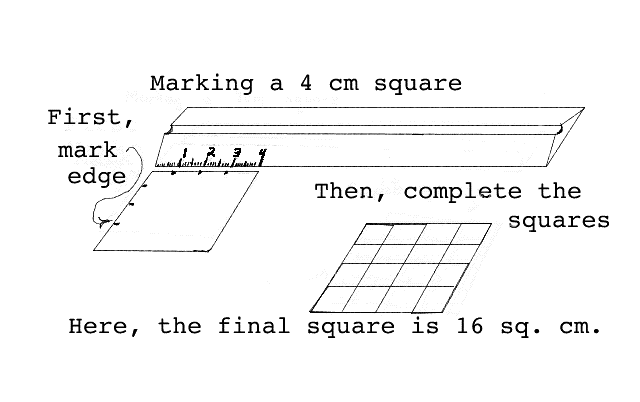
Measuring area: First have the students mark the edges of the colored squares with pencil marks one centimeter apart. After the square(s) have been marked, have them draw lines which will result in having the square ruled off in centimeter squares. Have them count the number of squares and enter the results in the space provided in the "Student Activity Sheet". Stress that the total area of the colored paper square is the number of square centimeters it takes to cover the the surface of the paper square.
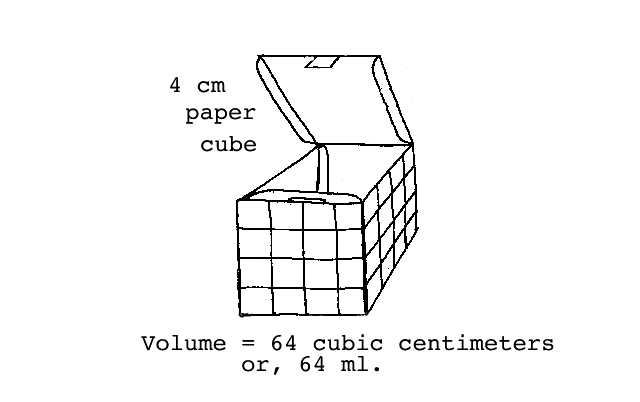
Measuring volume: Have the students cut out the patterns for the paper cubes. (We hope that this use of scissors isn't too demanding.) You must provide the instructions for folding and gluing the resulting cube. Note that the final structure will have an open top with a tab that can be slipped into a corresponding slot on the front of the cube. (The flaps on the top aren't really necessary but they seemed to work better for us.) After the cubes are constructed the students are to see if they can figure out how many little cubes one centimeter on a side would it take to fill the box. We hope having an actual cubical box with centimeter rule marks on each face will help the students to visualize and work out the correct response. Stress that the total volume of the box is the number of cubic centimeters it would take to fill the box. Have them record their results in the space provided in the "Student Activity Sheet".
Additional Volume Exercises:
Using sand or rice see how many boxes 3 cm on a side it will take to fill the box 6 cm on a side. (Sand might be a little hard on these lightweight boxes.) Most students will be surprised to discover that it will take eight boxes to do the trick. In fact, most of us really don't understand the scaling rules involved in filling volumes.
If you can, get a graduated cylinder (almost all are graduated in milliliters which is essentially the same as a cubic centimeter) and check the results of your volumes of the cubical boxes using sand or rice.
A soft drink can will have the volume of the can in milliliters (or cubic centimeters) printed on it. Either use a graduated cylinder and water to check this stated volume or, using sand or rice, see if you can work out a way to use the cubical boxes to check the measurement on the soft drink can.
(The next page begins the "Student Activity Sheet". It is suggested that they be reproduced in sufficient copies to make them available to groups or individual students.)
We live in three dimensional space which is often called 3D. Almost everything has three dimensions but some things, like a piece of string, have more of one dimension than than the other two. Something like a piece of paper or a picture has more of just two dimensions and most other things like people, houses and cars seem to be important in all three dimensions.

You will measure the length of several long thin colored strips of paper (or perhaps pieces of yarn.) Be sure the end of the ruler is lined up with the end of the strip and make sure you read the centimeter scale on the ruler. Write the results of your measurements in the data chart provided below. Make sure you write "centimeters" or the abbreviation "cm" after each measurement.
|
Color of thin strip |
Length of strip |
|
- |
- |
|
- |
- |
|
- |
- |
|
- |
- |

The area of something is the number of squares of a certain size it takes to cover the surface of the thing. You will be measuring the area of several different squares of colored paper. Before you can find the area of the pieces of paper, you should draw enough square centimeters to cover the paper. Use the ruler to mark all four edges of the paper square with little "ticks" one centimeter apart. Then join these ticks with straight lines and the colored piece of paper will be covered with square centimeters. Count the squares and write the results for each different colored piece of paper in the data chart below. Write the length of the square's side in "cm" and the number of squares required to cover the surface in "square cm".
|
Color of paper |
Length of each side |
Area of piece of paper |
|
- |
- |
- |
|
- |
- |
- |
|
- |
- |
- |
|
- |
- |
- |
The volume of any object is the number of cubes of a certain size it takes to fill the space inside of the object. Some objects have such a complicated shape that it might be hard to find how many cubes of a certain size it would take to fill them. We will be working with cubes so it will be fairly easy. First you will have to cut out and then glue together each of several different cube patterns to make little cubical boxes. The smallest box is 3 cm on a side and the largest is 6 cm on a side.

After you have constructed each of the four different sized cubical boxes, look at the lines on the outside surface and see if you can use them to figure out how many little cubes one centimeter on a side it would take to fill the box. This will be the volume of the box in "cubic centimeters". Use the table below to write down all the data on each of the different cubical boxes. Write the length of the box's edge in "cm", the area of the outside surface in "square cm" and the volume of the box in "cubic cm".
|
Length of box's edge |
Area of outside surface |
Volume of box |
|
- |
- |
- |
|
- |
- |
- |
|
- |
- |
- |
|
- |
- |
- |
Other special problems to consider:
1. How would you measure the length around the outside of a circle (called the circumference)? For example, how would you measure the circumference of a coin?
2. How would you measure the area of something with a strange shape like the bottom of your shoe or the surface of your hand?
3. How would you measure the volume of something like a bottle or a soft drink can?